Your first graph
In this tutorial you will install Nodos, open the editor, and build a graph that adds two numbers and displays the result. By the end you will have run something, and you will know why a Nodos graph needs an execution root before it does anything at all.
No programming is involved. Budget about 15 minutes.
What you need
- Windows 10 or later, Linux on x86_64 or aarch64, or macOS on Apple silicon — see Install Nodos.
- A GPU driver supporting Vulkan 1.2.
- Nothing else beyond that. The one-line installer brings its own prerequisites; the download wizard does not.
Step 1: Install the package manager
Nodos is distributed through nodos, its workspace and package manager. Get it from
Install Nodos, by any route on that page, then come back
here.
On Windows the one-line installer also checks for the Microsoft Visual C++ Redistributable and offers to install it if it is missing.
If you used the download and let the wizard install a bundle, you already have a workspace with
an engine in it. The wizard puts nothing on your PATH, so open a terminal in that folder and
skip to Step 3, where you run the workspace's own launcher directly.
Otherwise confirm the command is on your PATH:
Step 2: Create a workspace and fetch the engine
Nodos keeps everything — engine, modules, generated projects — inside a workspace: an ordinary
directory marked with a .nosman folder. Make one:
Now pull down an engine release. nodos get fetches a bundle, which is an engine plus a curated
set of modules:
Bundles
nodos.bundle.standard is a good default. There are others — minimal, broadcast, vs —
that trade download size against how much is preinstalled. See
Install Nodos.
The first run asks you to accept the EULA. Accept it to continue.
Step 3: Launch the editor
If you installed with the download wizard, nodos is not on your PATH — run the launcher from
inside the workspace folder instead: .\nodos launch on Windows, ./nodos launch on Linux or
macOS.
Two things start: nosLauncher, the host process that owns the engine and actually runs your
graph, and nosEditor, the UI that connects to it. This split matters later — the editor can
be closed, reconnected, or pointed at an engine on another machine, and the graph keeps running.
You should see an empty node graph.
Step 4: Add two numbers
Right-click on empty space in the node graph. This opens the node search menu, listing every node class the loaded modules provide.
- Search for Add and place it. It sits under the Arithmetic category.
- The Add node has three pins:
AandBas inputs, andOutput.
Notice that A, B and Output do not have a concrete data type yet. They are declared as
nos.Generic, and the node takes its type from whatever you connect or type into it. Set A to
2 and B to 3 directly in the node — the pins resolve to a numeric type as you do.
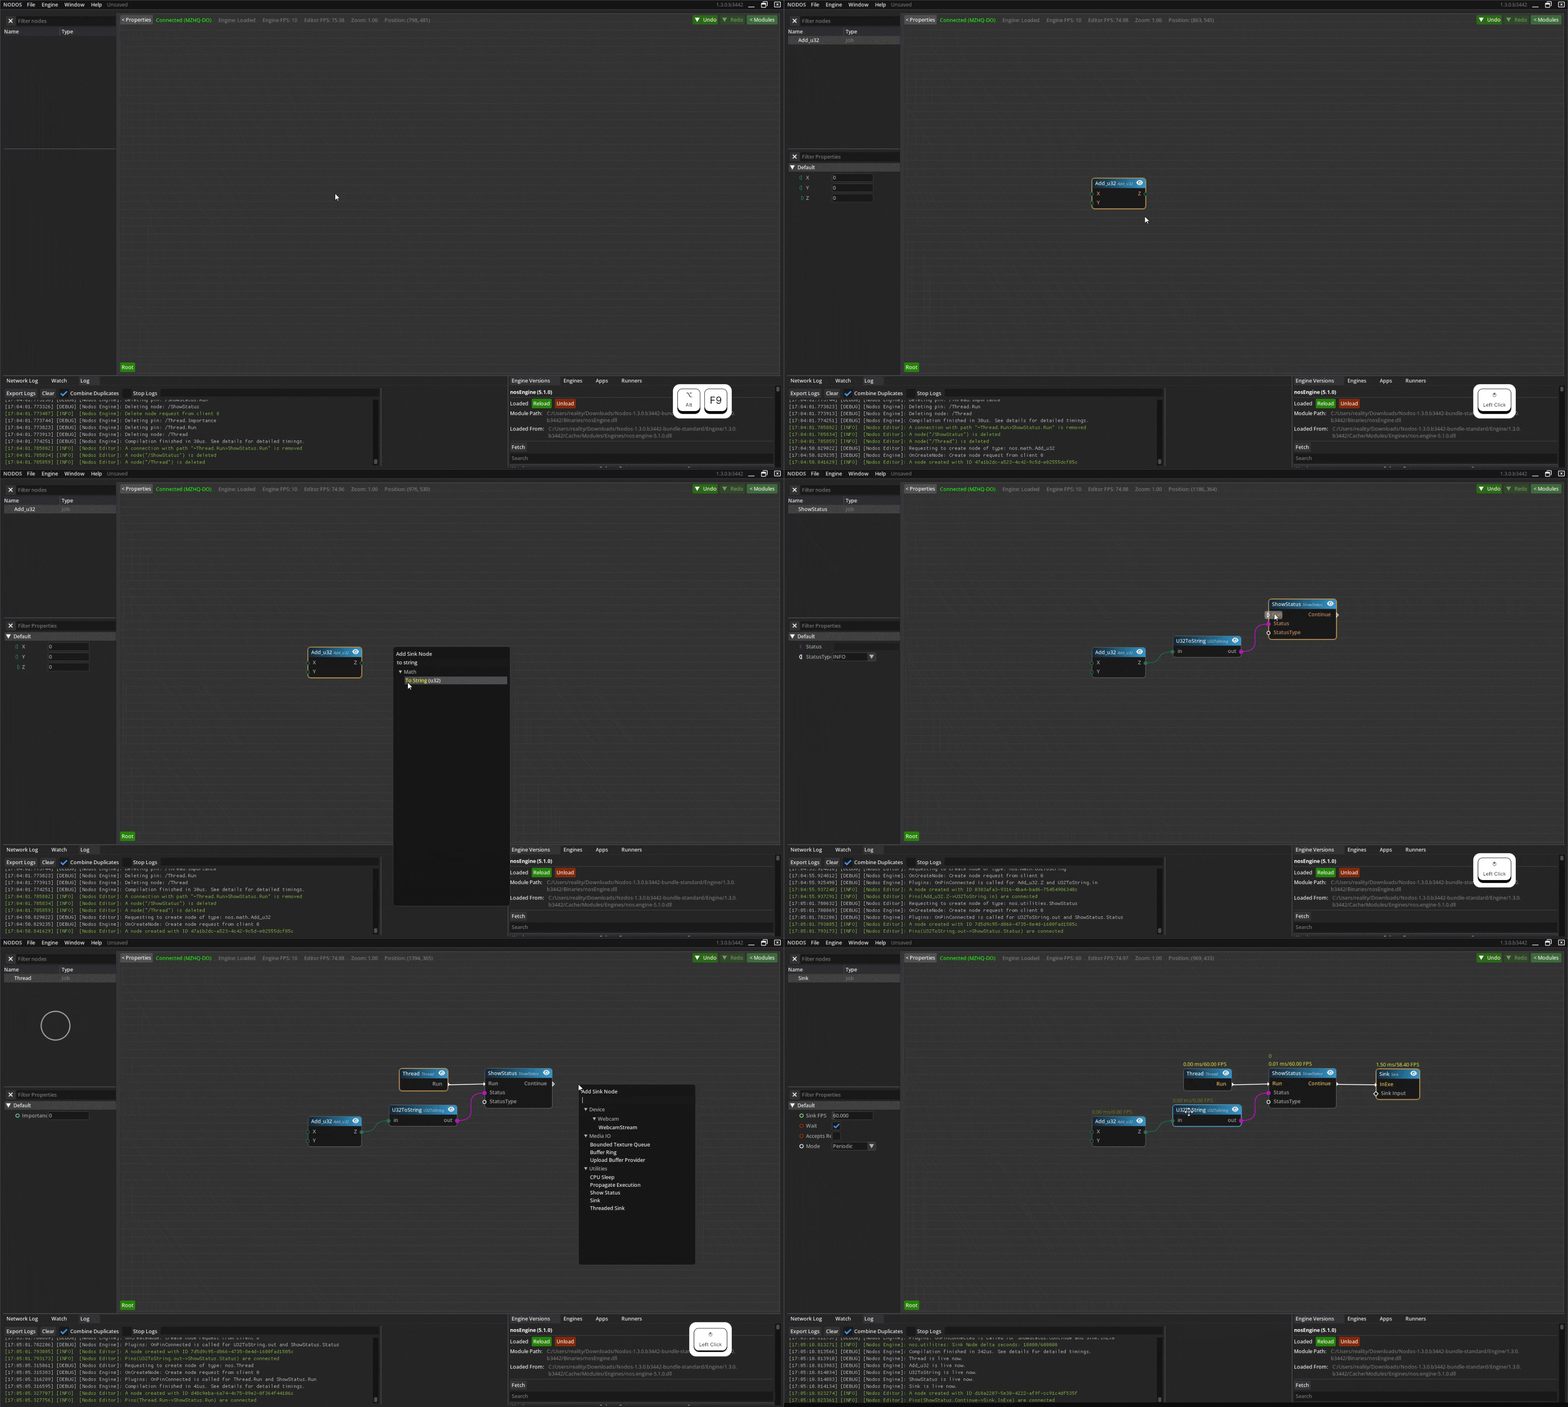
At this point nothing is running. The Add node is sitting in the graph, unscheduled. Nodos will not execute a node just because it exists.
Step 5: Give the graph a reason to run
A Nodos graph executes along paths, and a path needs two things: something to drive it and something to terminate it.
- Right-click and add a Thread node. This is the engine's
nos.Threadclass, and it represents an actual runner thread. It is where execution originates. - Right-click and add a Sink node, from the Utilities category. A sink terminates a path and
sets its rate — look at its
Sink FPSproperty, which defaults to 60.
Now wire it up:
- Drag from the Thread node's execution output to the Sink's
InExepin. Execution pins carry thenos.exetype and are drawn differently from data pins — they carry no value, only the fact that something should run. - Drag from the Add node's
Outputto the Sink'sSink Inputpin.
The graph now compiles into a path: the thread drives the sink at 60 FPS, the sink pulls its input, and pulling the input executes the Add node.
Why the extra ceremony?
Other node systems evaluate whatever is connected. Nodos schedules explicitly, because it is built for real-time work where when and how often a node runs is part of the problem, not an implementation detail. Scheduling and execution covers what the compiler does with the graph you just built.
Step 6: See the result
To watch the value, add a Show Status node from the Flow category. It displays whatever
reaches its Status pin as the node's own status message.
Insert it into the execution chain:
- Connect the Thread node's execution output to Show Status's
Runpin. - Connect Show Status's
Continuepin to the Sink'sInExepin. - Connect the Add node's
Outputto Show Status'sStatuspin.
Show Status now runs each frame and reports the sum.
You can also select the Add node and open the Watch pane to observe Output directly, which is
the general way to inspect any pin value while a graph runs.
What you built
graph LR
    T[Thread] -->|nos.exe| S[Show Status]
    S -->|nos.exe| K[Sink]
    A[Add] -->|Output| S
Three ideas are worth carrying forward:
Pins are typed, and some types are generic. nos.Generic pins resolve when connected. This is
how one Add node serves integers, floats and vectors. See
Built-in data types.
Execution is separate from data. nos.exe pins express ordering; data pins express values.
A node with no path to a sink never runs.
The engine is not the editor. You were editing a graph hosted in another process the whole time.
Next
- Your first plugin — write a node of your own in C++.
- Scheduling and execution — what actually happened when you connected that thread.
- Run Nodos headless — save this graph and run it without an editor.